 |
| As for my other recent HDR photos I used Magic Lantern 2.3 for this one. |
But with Magic Lantern things are so much easier. I can simply set number of photos I want and the spacing between them and I'm done. Here are the steps:
 |
| Magic Lantern main menu |
- Change your exposure mode to Manual.
- Open Magic Lantern menu and head over to the Shoot submenu using dial (it's 4 icon from the left in the image above).
- At the top of this submenu you will notice HDR Bracketing option. It's off by default. To toggle it, just press SET button.
- It will now use your previous settings. If you haven't set ones, or would like to change them press the FUNC button over it - it will open HDR Bracketing preferences.
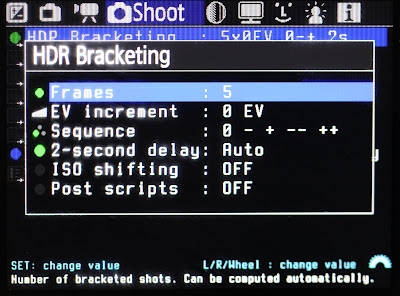
- From there you can adjust all the settings, with following being most useful (take a look at the image below for reference):
- Frames - number of exposures you would like to take. By default you can take any number from 2 - 9. There is even an Autodetect option which evaluates the scene and takes required number of shots. No need to guess!
- EV increment - EV spacing, values from 0 EV to 5 EV are possible. However, it's good to keep it in the range 1 EV - 2 EV. If you choose anything larger than that you will have not smooth color gradations as described here. If you choose value smaller than 1 EV you will need much more photos to cover the same dynamic range and also the benefit in terms of quality might be impossible to notice.
- Sequence - you can also adjust sequence in which photos are taken. In this case the choice is fairly limited and I usually keep it at default.

When you want to take a photo just press shutter release button and all the magic will happen :)


It's a great and well balanced shot.
ReplyDeleteWhich exposure did you us in Photomatix to freeze the sea. I just guess at EV-1 for water. It's a great programme and has got better over the years.
It used to take ages brushing an image back in in PS.
Thank you Adrian. I used 0 EV for water in this case
DeleteVery nice picture! I wish something like magic lantern would be available for us nikon users as well! Five exposures mean all manual work :-( Thanks for sharing.
ReplyDeleteHow would you take a nighttime hdr photo using ML? I've tried and it seems as if the shutter just stays open forever
ReplyDeleteIt isn't related to ML but to the fact that each exposure takes 2x more time for 1 EV spacing and 4x longer for 2 EV spacing. It means that if normal exposure in case of night shots is 30s, +1 EV will be 60s, +2 EV will be 120s, +3 EV - 240s and so on. Usually I just wait :) but you can also use faster apertures or ISO. Doing so have disadvantages of shallow depth of field and increasing noise levels.
ReplyDeleteIt works.Thanks for the trick on how to use lantern.
ReplyDelete