


 |
| In this photo I used techniques described in this tutorial. |
Take a look at 3 out 5 photos from the following sequence of bracketed photos I took during sunrise on Fuerteventura:
Water looks completely different in each of them! Details and smaller waves start to disappear with exposures becoming longer. I like the look of water in the last image most so I would like it to be used in the final image. However, if you decide to use deghosting you will most likely end up with something different as deghosting algorithm in HDR software might decide that it is better to use something different or to combine parts from different shots. And they might be right for technical reasons but not aesthetic ones.


There are two ways to deal with it, both can work as good (and I will show both of them):
- Use selection replacement tool in Photomatix Pro to replace water with any of the source photos,
- Mask regions of water in Photoshop CS using source images.
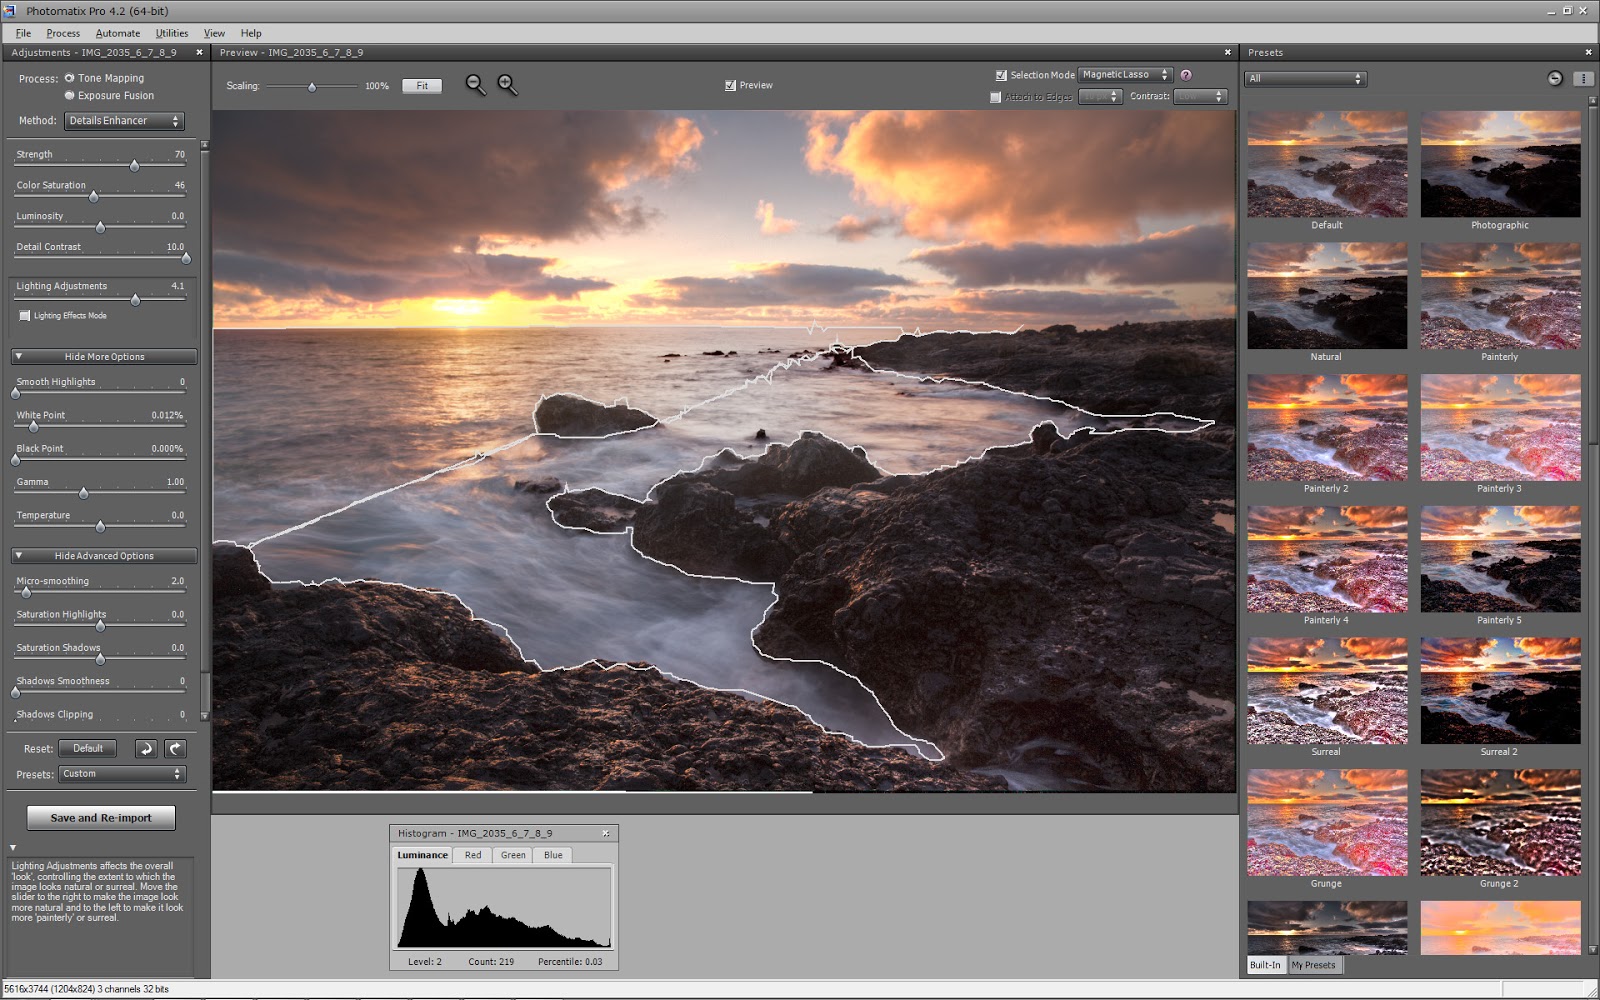
Selection replacement tool in Photomatix Pro
Selection replacement tool was introduced in Photomatix Pro 4.1 and is accessible while in Preview mode (i.e. where you can make adjustments to your tone-mapped photo). It allows you to replace a region of a photo with a corresponding region from one of the source images (when bracketed sequence was used) or from the original photo if you tonemapped a single photo. To access selection replacement just check Selection Mode checkbox in the top-right corner of the Preview window.


After you have region(s) selected, right-click on them and select with which exposure you would like to replace them. Note that not all exposure will work well - too dark or too bright ones might produce very artificial image. It is another reason why number of exposure and their spacing matters. Having more exposures and at smaller spacing simply gives you more options to choose from. In this case 0 EV, 1.5 EV and 3 EV photos were usable but both -1.5 EV and -3 EV resulted in a grungy and unrealistic image
.
Also this technique won't work well if you have some extremely overdone HDR image. To get best results you have to keep everything as realistic as possible. The reason for that is that any adjustments won't get applied to the selected region! So what I do is to use Default preset with small adjustments whenever possible. This keeps things pretty realistic.
 Such a great improvement! If you would like to preview your photo without selections' borders just uncheck Selection Mode.
As I disabled ghost removal water is full of artifacts caused by interfering and overlapping water (especially waves and foam). If you can't see them clearly in the image above below is a crop of a small part showing the issues:
In the image above foam overlaps pretty calm water what results in some weird gradations. Note that at first glance it could go unnoticed but it is always good to examine your photo at higher zoom levels to make sure everything is ok. It might look good on your monitor but if someone has bigger monitor or you decide to print your photo on large canvas you might be terribly disappointed. Such issues ruin a photo for me so I believe it is always good to look for them and get rid of them.
For that reason, in our example, we will select whole water region and replace it with the brightest photo (with pleasantly smoothed water). To do that:
For that reason, in our example, we will select whole water region and replace it with the brightest photo (with pleasantly smoothed water). To do that:
- Check Selection Mode checkbox in the top-right corner of the Preview window. Several new controls will appear as you can see in the image below.
- Choose lasso of your preference. By default Polygonal is used but you can also use Magnetic and Normal. For this image I used Magnetic as it made it easier to select water as there is quite big contrast between it and the rocks. Magnetic lasso tries to attach selection to the edges as you draw it (similarly to a tool with the same name in Photoshop). It will search for the edges in a radius given by combo-box with 30 px by default (you can change it between 10 and 50 px). You can also specify the contrast to look for. Make sure to adjust both settings for best performance.
- Select water region.
Note that I selected 2 regions in fact. The reason for this is that there was a rock in the middle of the water area which I didn't want to replace - I wanted to tone-map it.
After you have region(s) selected, right-click on them and select with which exposure you would like to replace them. Note that not all exposure will work well - too dark or too bright ones might produce very artificial image. It is another reason why number of exposure and their spacing matters. Having more exposures and at smaller spacing simply gives you more options to choose from. In this case 0 EV, 1.5 EV and 3 EV photos were usable but both -1.5 EV and -3 EV resulted in a grungy and unrealistic image
.
Also this technique won't work well if you have some extremely overdone HDR image. To get best results you have to keep everything as realistic as possible. The reason for that is that any adjustments won't get applied to the selected region! So what I do is to use Default preset with small adjustments whenever possible. This keeps things pretty realistic.
For the purpose of this sample I used +3 EV image for both regions and I ended up with an image like this:
Such a great improvement! If you would like to preview your photo without selections' borders just uncheck Selection Mode.
If you're happy with the results just press Process or Save and Re-import if you invoked Photomatix Pro from Lightroom (as I did). Here is image after processing it in Photomatix Pro:
 Not bad! Water looks as I wanted it too look. The image of course lacks some contrast and colours but in Photomatix Pro I usually care mostly about light and details as described in my post about achieving realistic results in this program.
Masking in Photoshop CS
This is similar approach conceptually but is executed a bit differently. Instead of replacing part of the image with source photo at the stage of tone-mapping I do this after opening ready tone-mapped image in Photoshop CS and I use layer masks to achieve this result:
 And a corresponding layer mask:

- Process your HDR image in Photomatix Pro normally but make sure you have Remove ghosts and Crop aligned results options disabled. Also in this case make sure your processing style is realistic.
- Save tonemapped image in Photomatix Pro.
- Open saved image in Photoshop CS.
- Add as layers your source photos (at least the one you would like to use as water).
- Select both layers and choose Edit -> Auto-align layers. The reason for that is that even if you used tripod there might be small misalignment between the layers. This command should get rid of it. What's more if you forgot to uncheck Crop aligned results in step 1 Photoshop may fail to properly align your layers! That's why it's so important to uncheck this box when you have "masking" in mind.
- Add a layer mask to your newly added layer, select this layer mask and press CTRL + I (this will turn it from white to completely black).
- Now with white and very smooth brush start to paint over the water region on your layer mask. Water from your source photo will start to appear.
- You might need to change brush size as you go. Use [ and ] keys to control its size without going to the menus.
- At any time you can preview your layer mask by left-clicking on it with ALT key pressed.
- Continue until you recovered all your water area from source photo.
Summary
Note that results from both approaches are very close. There are some subtle differences but if I would spend more time on the mask in Photoshop (or on selection in Photomatix) they will be almost identical. The reason for this is that what Photomatix does is in fact masking - meaning that it does something very close to what you do in Photoshop!
I use both approaches, sometimes I even combine them to get best results possible. By best I mean both of high quality and created in the shortest time possible.
What's more at this stage the image is far from being finished. I usually increase contrast, colour saturation and sharpen it.
The last piece of advice. You can use this technique not only on water but also on clouds, grass or any other diffused subjects.
Excellent....a really good tutorial. The De-ghost in Photomatix has come on by leaps and bounds over the years.
ReplyDeleteI will have to try a big print of an HDR image. Never dared yet.
I suspect it will be back to hours of masking.
It would be good if Photomatix gave a better control over the selection tool. Feather/Contract/Expand. Next year perhaps.
I have one HDR printed in 120 x 80 cm... and it looks absolutely amazing. Level of detail makes it almost 3-dimensional.
DeleteI'll give printing them a go.
DeleteExcellent detail!!!!!!!!!
ReplyDelete