


Note: this tutorial was originally published on HDR One, where I'm regular contributor.

When reading various on-line posts and articles related to HDR photography I often see that there is quite a lot of misunderstanding and myths about it. Many users don’t really know what an HDR image really is, what the difference between HDR and exposure fusion is and what really is tone-mapping apart from a buzz word. Sometimes I’m not even sure if they know why they use HDR at all… maybe because it’s just trendy?
Even though without understanding all of these terms it is possible to create appealing and beautiful images, I still think that it’s worth being more aware of what we, HDR photographers, are really into. It’s also better to know for one more reason – this might help you in focusing on things other than that which you are currently focusing on when shooting your HDR photos. Changing points of focus might in turn result in better images. In this article I will give you some basic ideas, but I won’t delve into the super complicated maths behind HDR and tone-mapping.
It’s even worse with digital cameras which have even lower dynamic range than our eyes. Typical cameras available on the market today have a dynamic range of 10 or more EVs. For instance according to DxOMark my Canon 5D MK II has a dynamic range of about 11 EVs. What do those 11 EVs really mean? Well, 2 EV is two times brighter than 1 EV, 4 EV is 2 times brighter than 2 EV and 4 times brighter than 1 EV… 11 EV is 2 times brighter than 10 EV, 4 times brighter than 9 EV, 8 times brighter than 8 EV and so on. As you can see we can turn EVs into a power of 2 and write our ratio this way:
In the case of my Canon 5D MK II DSLR it will be:
only 2.000 : 1! 5 times worse than my own eyes! And it’s quite a powerful camera (old but still powerful). Now think about that for a while… with typical photography we can capture only a fraction of a real-life scene’s luminosity and detail. Most of it is lost (either in shadows or highlights or both). But things get even worse… due to the design of cameras, data about luminosity isn’t distributed uniformly. Instead the brightest stop corresponds to 50% of all data, next stop to 25% of all data, next 12.5%… It means that 3 brightest stops corresponds to almost 90% of all data! It means that there isn’t much left for the darkest part of the regions meaning that they won’t be as detailed as highlights. So although cameras can capture 10 EVs or more there is very little information about shadows. That’s why we need to pay extra attention to properly capturing details in shadows and that is the reason for the concept of exposing the image to the right (meaning that histogram is aligned to the right). But even when exposing to the right we won’t cover the whole dynamic range of the scene in the majority of cases. That’s when HDR comes into play.
The typical image that can be displayed on a customer’s monitor has 8-bits per channel (given that typical display device can display 3 channels it results in 24-bit depth total). It means that each channel (that is red, green and blue) can have only 255 different values. Note that our monitors cannot even display 16-bit images we often work with HDR in turn is typically associated with images with 32-bits per channel. That means that a lot more data can be stored in each channel (32-bit precision allows for 4,294,967,296 different values to be stored in a single channel!) enough to represent real-life scenes in a correct way. So HDR is more an image representation than post-processing techniques that so many associate it with. HDR doesn’t have anything to do with color over-saturation, halos or other typical problems that so many users and photographers complain about. It has nothing to do with ghosting, alignment, etc. These are all imaging algorithms – nothing more.
HDR is a concept of storing the image so it contains all necessary luminosity data. Both LDR (low-dynamic range – eg. typical photos like JPGs) and HDR images can be thought of as models of reality but the fact is that HDR is more close to it because it can store more luminosity information than typical LDR images are capable of. That is, it can represent reality better. It doesn’t capture more information than there is present in the scene but it can capture more information than our cameras see. It makes the statement: “HDR is unreal” false. It’s like saying that infrared photography is unreal because it shows part of the light spectrum we don’t normally see. Or that macro with scale of 2:1 is unreal because it works more like a microscope than photography… even black & white might be unreal because we see world in colours… HDR is real, it is tone-mapping that might result in unrealistic results (about that in a second).
Now, given that I said that HDR is a model of reality it shouldn’t be surprising that contrary to what some people think HDR isn’t limited to photography. It can be used in movies, 3D graphics and also in video games – everywhere where modelling a reality is necessary.

As I mentioned, there is a problem with displaying HDR images directly on the monitor because the current generation of display devices aren’t capable of handling images with so many different luminosity values and with such high contrast. There are some projects of 32-bit display devices but most of them are academic and certainly not-widely used at the moment (not to mention their price...).
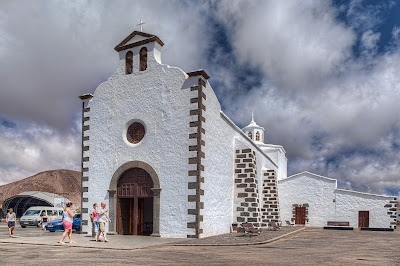
You can try displaying HDR images in a few applications, for instance in the image above you can see how Photomatix shows HDR images before going into tone-mapping (where all the fun begins really). It basically shows part of the image’s exposure, a lot of details in the shadows and highlights cannot be displayed because the monitor can’t show them.
As we would like to be able to display HDR on a monitor, what we need to do is to map our high-dynamic range image into the luminosity range that our monitor can display, that is to convert our image back to a LDR image in a process known as tone-mapping. This might sound silly at first because what is the purpose of capturing HDR image just to convert it back to LDR? Wouldn’t it be better to just capture LDR image and save yourself a lot of time? Well, yes, it would be better and easier but normal LDR images from a camera will always have less detail or contrast than a tone-mapped LDR image has for reasons given earlier.
The same HDR image as above after tone-mapping is applied might look something like this:
 The difference is huge. Also note that if you captured a single LDR exposure you would have to choose whether to expose for the sky or whether to exposure for the rest of the scene. In one case everything but the sky would be very dark in the other one the sky would be blown out. With tone-mapped image we can have both nicely exposed.
As you may have guessed already there are virtually infinite ways of mapping HDR images into the range of the monitor. This is why all software is different and produces different results – each uses different tone-mapping functions. What’s more even the same software might offer different tone-mapping functions, eg. Photomatix offers Details Enhancer (which is great for enhancing detail) and Tone Compressor (which produces some very nice colours). Also the functions can often be customized by a user eg. by dragging a slider in Photomatix Pro.
Tone-mapping might be both a very simple (or even trivial) or a very complex function. In its simplest form it may just scale all the luminosities of the image linearly:
where:
 Step 2. is where all the magic really happens. The input to the tone-mapping step is usually a grayscale image containing luminosity for each of the pixels calculated in step 1.
Given that in the case of HDR image red, green and blue values might be much bigger than 255, luminosity can also be greater than 255. Therefore it needs to be scaled in such a way that luminosities of all pixels fit into the 0 – 255 range. You can think of tone-mapping as compression method. Also in this step it might be desirable to make sure that enough details in shadows and highlights are preserved (linear tone-mapping operator doesn’t do that).
It means that it is luminosity that is mapped into the luminosity range of the monitor and not colour.
Output from this step is a grayscale image with all luminosities tone-mapped to the displayable range.
where:
Of course there might be some additional steps, like gamma correction, or the procedure might be slightly different but you get the idea.
As I said before, the algorithm described above is known as a linear tone-mapping. It basically scales all the luminosity values to the available range. It doesn’t take any image characteristics into account and most of the time it results in a very dark image (unless gamma correction is used). Also it uses the same function on all pixels of the image. For that last reason it is known as a global tone-mapping operator. There are also local operators and here is short summary of both groups:

Still not convinced that HDR isn’t about colour? Ok, here is another example. Some operators, including for instance Durand and Dorsay tone-mapping operator (another basic and well-known operator), works on details. First they convert an image to a luminance map. It is then decomposed into base layer and detail layer. Base layer is one on which all the tone-mapping happens. Once processing it is finished, a detail map is added to it. Finally the result is multiplied by the color layer. It means that again color is applied to an already tone-mapped image at the last step.
At the beginning of this article I also mentioned something like Exposure Fusion. What’s that?
Exposure fusion is a technique of blending several input images – a technique well known to many photographers because they have been manually blending several exposures for many years. Exposure fusion doesn’t have much to do with HDR as it doesn’t use wide dynamic range images at all. It’s all about taking pixels from the source photos and outputting them to the final image. The decision whether to take a pixel from a photo or not is based on different characteristics ranging from algorithm to algorithm. You might consider well-exposedness, colour saturation, noise-level etc.
When someone does something often called manual HDR blending, he in fact uses processes very similar to exposure fusion. Why? Because exposure fusion is a process where source images are taken and blended directly into a LDR image that is without steps of generating HDR and tone-mapping. Similarly here, the user decided whether to take a pixel (or group of them) from one photo or from another one.
But also keep in mind that in order to make your resulting images realistic you have to pay special attention to tone-mapping as this is where things can go wrong (meaning – unrealistic). Each of the HDR software offers surreal or grungy presets. If you’re into a realistic look – stay away from them. In Photomatix I usually use the Default preset with just a few adjustments. Is it boring? Might be – but reality is often boring as well. I believe we shouldn’t change it entirely but we should capture it as it is. We can then enhance it a little bit in post-processing.
When reading various on-line posts and articles related to HDR photography I often see that there is quite a lot of misunderstanding and myths about it. Many users don’t really know what an HDR image really is, what the difference between HDR and exposure fusion is and what really is tone-mapping apart from a buzz word. Sometimes I’m not even sure if they know why they use HDR at all… maybe because it’s just trendy?
Even though without understanding all of these terms it is possible to create appealing and beautiful images, I still think that it’s worth being more aware of what we, HDR photographers, are really into. It’s also better to know for one more reason – this might help you in focusing on things other than that which you are currently focusing on when shooting your HDR photos. Changing points of focus might in turn result in better images. In this article I will give you some basic ideas, but I won’t delve into the super complicated maths behind HDR and tone-mapping.
What really is HDR?
HDR stands for High Dynamic Range. Everyone knows that. But first let’s define dynamic range (forget about high for a moment) – it is a ratio between the lowest and highest luminance in the scene. Or simply a ratio between darkest and brightest points in it. Our eyes have dynamic range of about 10.000:1. It means that they are capable of capturing details in such a range of brightness. However, dynamic range of a real-life scene may be 10 or more times higher (eg. 100.000:1)!It’s even worse with digital cameras which have even lower dynamic range than our eyes. Typical cameras available on the market today have a dynamic range of 10 or more EVs. For instance according to DxOMark my Canon 5D MK II has a dynamic range of about 11 EVs. What do those 11 EVs really mean? Well, 2 EV is two times brighter than 1 EV, 4 EV is 2 times brighter than 2 EV and 4 times brighter than 1 EV… 11 EV is 2 times brighter than 10 EV, 4 times brighter than 9 EV, 8 times brighter than 8 EV and so on. As you can see we can turn EVs into a power of 2 and write our ratio this way:
2 ^ EV_Value : 1
In the case of my Canon 5D MK II DSLR it will be:
2 ^ 11 = 2048 : 1…
only 2.000 : 1! 5 times worse than my own eyes! And it’s quite a powerful camera (old but still powerful). Now think about that for a while… with typical photography we can capture only a fraction of a real-life scene’s luminosity and detail. Most of it is lost (either in shadows or highlights or both). But things get even worse… due to the design of cameras, data about luminosity isn’t distributed uniformly. Instead the brightest stop corresponds to 50% of all data, next stop to 25% of all data, next 12.5%… It means that 3 brightest stops corresponds to almost 90% of all data! It means that there isn’t much left for the darkest part of the regions meaning that they won’t be as detailed as highlights. So although cameras can capture 10 EVs or more there is very little information about shadows. That’s why we need to pay extra attention to properly capturing details in shadows and that is the reason for the concept of exposing the image to the right (meaning that histogram is aligned to the right). But even when exposing to the right we won’t cover the whole dynamic range of the scene in the majority of cases. That’s when HDR comes into play.
The typical image that can be displayed on a customer’s monitor has 8-bits per channel (given that typical display device can display 3 channels it results in 24-bit depth total). It means that each channel (that is red, green and blue) can have only 255 different values. Note that our monitors cannot even display 16-bit images we often work with HDR in turn is typically associated with images with 32-bits per channel. That means that a lot more data can be stored in each channel (32-bit precision allows for 4,294,967,296 different values to be stored in a single channel!) enough to represent real-life scenes in a correct way. So HDR is more an image representation than post-processing techniques that so many associate it with. HDR doesn’t have anything to do with color over-saturation, halos or other typical problems that so many users and photographers complain about. It has nothing to do with ghosting, alignment, etc. These are all imaging algorithms – nothing more.
HDR is a concept of storing the image so it contains all necessary luminosity data. Both LDR (low-dynamic range – eg. typical photos like JPGs) and HDR images can be thought of as models of reality but the fact is that HDR is more close to it because it can store more luminosity information than typical LDR images are capable of. That is, it can represent reality better. It doesn’t capture more information than there is present in the scene but it can capture more information than our cameras see. It makes the statement: “HDR is unreal” false. It’s like saying that infrared photography is unreal because it shows part of the light spectrum we don’t normally see. Or that macro with scale of 2:1 is unreal because it works more like a microscope than photography… even black & white might be unreal because we see world in colours… HDR is real, it is tone-mapping that might result in unrealistic results (about that in a second).
Now, given that I said that HDR is a model of reality it shouldn’t be surprising that contrary to what some people think HDR isn’t limited to photography. It can be used in movies, 3D graphics and also in video games – everywhere where modelling a reality is necessary.
Displaying HDR image – tone-mapping

As I mentioned, there is a problem with displaying HDR images directly on the monitor because the current generation of display devices aren’t capable of handling images with so many different luminosity values and with such high contrast. There are some projects of 32-bit display devices but most of them are academic and certainly not-widely used at the moment (not to mention their price...).
You can try displaying HDR images in a few applications, for instance in the image above you can see how Photomatix shows HDR images before going into tone-mapping (where all the fun begins really). It basically shows part of the image’s exposure, a lot of details in the shadows and highlights cannot be displayed because the monitor can’t show them.
As we would like to be able to display HDR on a monitor, what we need to do is to map our high-dynamic range image into the luminosity range that our monitor can display, that is to convert our image back to a LDR image in a process known as tone-mapping. This might sound silly at first because what is the purpose of capturing HDR image just to convert it back to LDR? Wouldn’t it be better to just capture LDR image and save yourself a lot of time? Well, yes, it would be better and easier but normal LDR images from a camera will always have less detail or contrast than a tone-mapped LDR image has for reasons given earlier.
The same HDR image as above after tone-mapping is applied might look something like this:

As you may have guessed already there are virtually infinite ways of mapping HDR images into the range of the monitor. This is why all software is different and produces different results – each uses different tone-mapping functions. What’s more even the same software might offer different tone-mapping functions, eg. Photomatix offers Details Enhancer (which is great for enhancing detail) and Tone Compressor (which produces some very nice colours). Also the functions can often be customized by a user eg. by dragging a slider in Photomatix Pro.
Tone-mapping might be both a very simple (or even trivial) or a very complex function. In its simplest form it may just scale all the luminosities of the image linearly:
toneMappedLuminosityOfAPixel = (luminosityOfAPixel – minLuminosity) / (maxLuminosity – minLuminosity),
where:
- toneMappedLuminosityOfAPixel – tone-mapped luminosity of a pixel
- luminosityOfAPixel – luminosity read from HDR file
- minLuminosity – minimum luminosity from all the luminosity values in HDR file
- maxLuminosity – maximum luminosity from all the luminosity values in HDR file
- Converting HDR image to luminance map.
- Tone-mapping.
- Applying colours to the tone-mapped image.
Step 1. Converting an HDR image to a luminance map.
I love the saying that “HDR is about light and details not colour” as it is very true. Light in terms of computer graphics is luminosity. Luminosity tells how bright the colour (or light which is basically the same in physics) is. You might think that luminosity is calculated as 0.33 * R + 0.33 * G + 0.33 * B where R, G, B stand for red, green and blue value of a pixel respectively. It’s not that simple I’m afraid because our eyes perceive each of the wavelengths in a slightly different way. Blue seems to be the darkest colour to our eyes, green – the brightest. So researchers came up with a few equations to calculate luminosity, eg:- luminosity = 0.299 * R + 0.587 * G + 0.114 * B which is believed to be used by Photoshop, or
- luminosity = 0.27 * R + 0.67 * G + 0.06 * B, present in Reinhard’s et. al. algorithm’s paper. Probably you’re not familiar with Reinhard’s algorithm but in fact it is one of the first and most popular tone-mapping operators.
Step 2. Tone-mapping
 Step 2. is where all the magic really happens. The input to the tone-mapping step is usually a grayscale image containing luminosity for each of the pixels calculated in step 1.
Given that in the case of HDR image red, green and blue values might be much bigger than 255, luminosity can also be greater than 255. Therefore it needs to be scaled in such a way that luminosities of all pixels fit into the 0 – 255 range. You can think of tone-mapping as compression method. Also in this step it might be desirable to make sure that enough details in shadows and highlights are preserved (linear tone-mapping operator doesn’t do that).
It means that it is luminosity that is mapped into the luminosity range of the monitor and not colour.
Output from this step is a grayscale image with all luminosities tone-mapped to the displayable range.
Step 3. Applying colours to the tone-mapped image
At this stage luminosity already fits into the range that the monitor can display but the image is still black & white. So in this step we just restore colours. How it is done differs from algorithm to algorithm but in the simplest case, each of the colour channels might be calculated as:
red = redInHdr * (toneMappedLuminance / luminance),
where:
- redInHdr – is red value read from the HDR file,
- toneMappedLuminance – is a value from the Step 2.,
- luminance – is luminance from luminance map from Step 1.
Of course there might be some additional steps, like gamma correction, or the procedure might be slightly different but you get the idea.
As I said before, the algorithm described above is known as a linear tone-mapping. It basically scales all the luminosity values to the available range. It doesn’t take any image characteristics into account and most of the time it results in a very dark image (unless gamma correction is used). Also it uses the same function on all pixels of the image. For that last reason it is known as a global tone-mapping operator. There are also local operators and here is short summary of both groups:
- global operators – each pixel is tone-mapped in the same way based on some global image characteristics (like eg. luminosity). As you may have guessed this makes these kind of methods really fast (that’s one of the reasons they are used in video games more commonly than local operators) but there might be some loss of detail. The greater the dynamic range of the source image the greater loss of detail is possible.
- local operators – are working on the local features of the image. It means that tone-mapping might work differently for each pixel of the image depending on characteristics of its surrounding. Local operators are commonly used in HDR software because they produce more appealing images with details and micro-contrast being well enhanced. However, local tone-mapping operators have a few drawbacks. First of all they can amplify noise in the image as software cannot always determine if something is just noise or very small detail so it treats it as detail. When small details are enhanced, so is the noise. Tone-mapping is no exception here. Many sharpening tools must deal with the same issue. Another issue with local tone-mapping operators is they can produce halo artifacts around the edges.

Still not convinced that HDR isn’t about colour? Ok, here is another example. Some operators, including for instance Durand and Dorsay tone-mapping operator (another basic and well-known operator), works on details. First they convert an image to a luminance map. It is then decomposed into base layer and detail layer. Base layer is one on which all the tone-mapping happens. Once processing it is finished, a detail map is added to it. Finally the result is multiplied by the color layer. It means that again color is applied to an already tone-mapped image at the last step.
And Exposure Fusion? What is that?
Note: you can read more details about exposure fusion in my other tutorial.At the beginning of this article I also mentioned something like Exposure Fusion. What’s that?
Exposure fusion is a technique of blending several input images – a technique well known to many photographers because they have been manually blending several exposures for many years. Exposure fusion doesn’t have much to do with HDR as it doesn’t use wide dynamic range images at all. It’s all about taking pixels from the source photos and outputting them to the final image. The decision whether to take a pixel from a photo or not is based on different characteristics ranging from algorithm to algorithm. You might consider well-exposedness, colour saturation, noise-level etc.
When someone does something often called manual HDR blending, he in fact uses processes very similar to exposure fusion. Why? Because exposure fusion is a process where source images are taken and blended directly into a LDR image that is without steps of generating HDR and tone-mapping. Similarly here, the user decided whether to take a pixel (or group of them) from one photo or from another one.
Summary
I hope that these few paragraphs increased your knowledge of HDR a little bit. You should now be convinced that HDR isn’t at all about a surreal look, over-saturated colours or artifacts like halos or ghosting. It’s about representing reality in a better and more appropriate way than traditional photography.But also keep in mind that in order to make your resulting images realistic you have to pay special attention to tone-mapping as this is where things can go wrong (meaning – unrealistic). Each of the HDR software offers surreal or grungy presets. If you’re into a realistic look – stay away from them. In Photomatix I usually use the Default preset with just a few adjustments. Is it boring? Might be – but reality is often boring as well. I believe we shouldn’t change it entirely but we should capture it as it is. We can then enhance it a little bit in post-processing.
Very nice tutorial! :-)
ReplyDeleteGreetings from the Netherlands,
DzjieDzjee
Glad you liked it Gert
ReplyDelete