New tutorial today on my blog. I will describe Exposure Fusion processing method available eg. in Photomatix Pro, Photomatix Essentials and Enfuse. Note that originally this article
was published on HDR One page and I really recommend visiting that site as it's full of free HDR resources by some world's best HDR photographers (what I'm doing amongst them is sort of mystery ;) ). Note 2: this article will soon become part of
my comprehensive HDR tutorial.
INTRODUCTION
A long time ago when no one had heard about HDR, photographers were
still able to increase the dynamic range of their photos. What they did,
and many photographers still do, was to open several exposures in
Photoshop and blend them using layer masks. When they blended the
layers they had to decide which image to use for each region of the
image. This way they could restore highlights using an underexposed
photo and details in shadows using an overexposed one. Nowadays this
technique is commonly referred to as
manual blending or XDR for
extended dynamic range (compared to
high dynamic range).
Exposure Fusion is based on that experience but it is a more automatic
process. Instead of doing it manually you can blend your images directly
in Photomatix. Basically exposure fusion is about taking the best
pixels from all photos and outputting them to the final image. Whether a
pixel can be considered good or bad depends on many factors like for
instance colour saturation, well-exposedeness, low noise-level etc. Also
exposure fusion isn’t limited to simple read and write operations. For
any pixel it can take data from 1 image or from all images and to
calculate the mean of values read (or some other characteristic). It can also increase colour
saturation and much more. The possibilities are virtually endless.
Unfortunately not many HDR software offer exposure fusion.
Photomatix
(both Pro and Essentials) and Enfuse are the most popular ones with
such functionality built-in. I will focus on the first one in this
tutorial.
Before jumping into details on processing using Exposure Fusion, here are some of the benefits of using it:
- exposure fusion results in noise reduction (contrary to local
tone-mapping which amplifies noise) – this makes it perfect for night
and long-exposure “HDR” photos,
- images have more natural look. Especially real-estate, night and foggy shots benefit from this natural look.
- images are free of halo artifacts,
- using exposure fusion might be easier because it has fewer
parameters to set – also it is more intuitive as many photographers are already familiar with notion of blending images.
And here are drawbacks of it:
- images lack local contrast compared to tone-mapped images. However, this can be improved in post-processing,
- high memory usage that increases with bit-depth and number of images,
- works only with multiple exposures, if you need to use it for a
single exposure you need to derive fake multiple exposures from it (eg. by
adjusting Exposure slider in Lightroom and then exporting as TIFF/JPG). You can read how to this in my tutorial.
As you can see from above, exposure fusion produces images that
doesn’t have problems typical for HDR photography: noise, halos and
unnatural look. Sounds great, doesn’t it? Well, that’s one of the
reasons exposure fusion became so popular amongst real estate
photographers. That's also the reason why I use it for the majority of my night shots.
CREATING FUSED IMAGES IN PHOTOMATIX PRO
Creating fused images in Photomatix Pro doesn’t differ much from
regular tone-mapping workflow. The main difference is step 1 below:
1) Make sure to use a dedicated RAW converter to convert images to
JPG/TIFFs prior to loading them into Photomatix. This way you will
achieve best quality. The reason for this is that the Raw converter
built into Photomatix is quite simple – although sufficient for
tone-mapping it doesn’t produce as good results when used together with
exposure fusion. For this reason I always develop my images in Lightroom
and then export them to Photomatix using the Lightroom plug-in (which
comes with your copy of Photomatix Pro).
2) You start by selecting photos to fuse. As I already mentioned you
need 2 or more photos to be able to use Exposure Fusion in Photomatix.
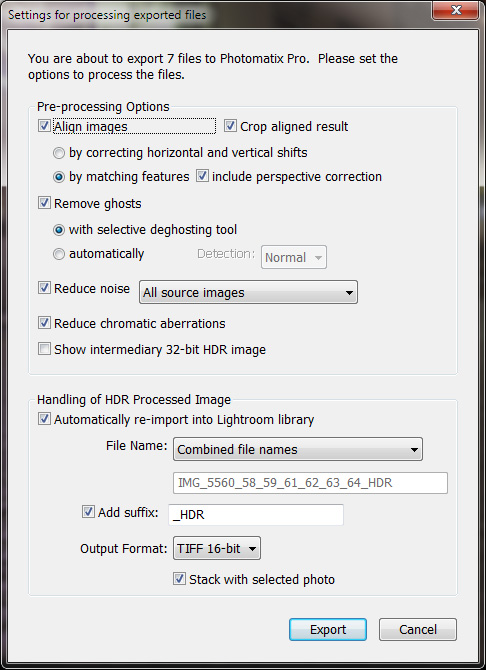
3) After clicking ok, you need to specify Preprocessing Options. I specified them this way and clicked Ok:
A few notes here. First of all if you’re using Lightroom, make full
use of it. It has a powerful Raw converter so if you still remember
point 1, it’s better to use it instead of Photomatix’s. Another benefit
is that Photomatix integrates pretty well with Lightroom. If you haven’t
already, make sure to install the Lightroom plug-in which comes with
your copy of Photomatix. This way if you right click your images ->
select Export -> Photomatix Pro you will be able to run Photomatix
directly from Lightroom.
For this example I shot the photos with a tripod (7 exposures at 1 EV
spacing). There could still be some small horizontal and vertical
movement so I checked
Align images by correcting horizontal and vertical shifts box. Also there were some people moving in the frame so I checked
Remove ghosts option.
4) In Preview mode switch Process to Exposure Fusion:
5) Just below Process, there is a method combo-box. Select one of the following methods:
- Fusion/Natural – it produces the most natural-looking results (hence the name). I will focus on this method in this tutorial,
- Fusion/Intensive,
- Fusion/Auto – fuses images automatically, you can’t control the process at all,
- Fusion/Average – averages the images. Same as above – you have no influence on the look of the images,
- Fusion/2 images – let’s you select two images of all your exposures and then fuses only them,
- Fusion/Realistic – this option produces best results (at
least for real estate photographers), however, it is also the most
computationally-expensive one. For this reason it’s only available in
batch mode
6) Specify parameters. For
Fusion/Natural they are:

- Strength – strength of local contrast enhancements. I
usually leave it at 0.0 or move it to the left (negative values) as it
tends to produce more natural looking images
- Blending point - specifying negative value gives more
weight to underexposed images; positive values give more weight to
overexposed images in turn. If it sounds confusing – moving slider to
the left makes Fusion algorithm “prefer” underexposed photos. Moving to
the right, make it prefer overexposed ones.
- Shadows – brightens the shadows. I usually move this value
to 10.0 which is maximum for this setting. This way I can restore more
details in shadows.
- Local contrast – increases sharpness and local contrast of
details in the image. I mentioned that Exposure Fusion does have worse
local contrast than tone-mapping – this setting tries to overcome this. I
try to keep this value in range 0.0 to 3.0. Larger values might result
in a painterly and unnatural look. Value of 2.0 usually works best.
- Color saturation – increases or decreases saturation of
colors in the image. I usually keep it at 0 as I play with colour later
in Photoshop or Lightroom.
- White clip – clips the highlights. I usually don’t change it.
- Black clip – clips the shadows. I usually don’t change it.
- Midtone - specifies brightness of midtones. I usually move it to the right to the degree that depends stricly on the image
For my image I used settings from the image above.
7) Hit process button and save your image
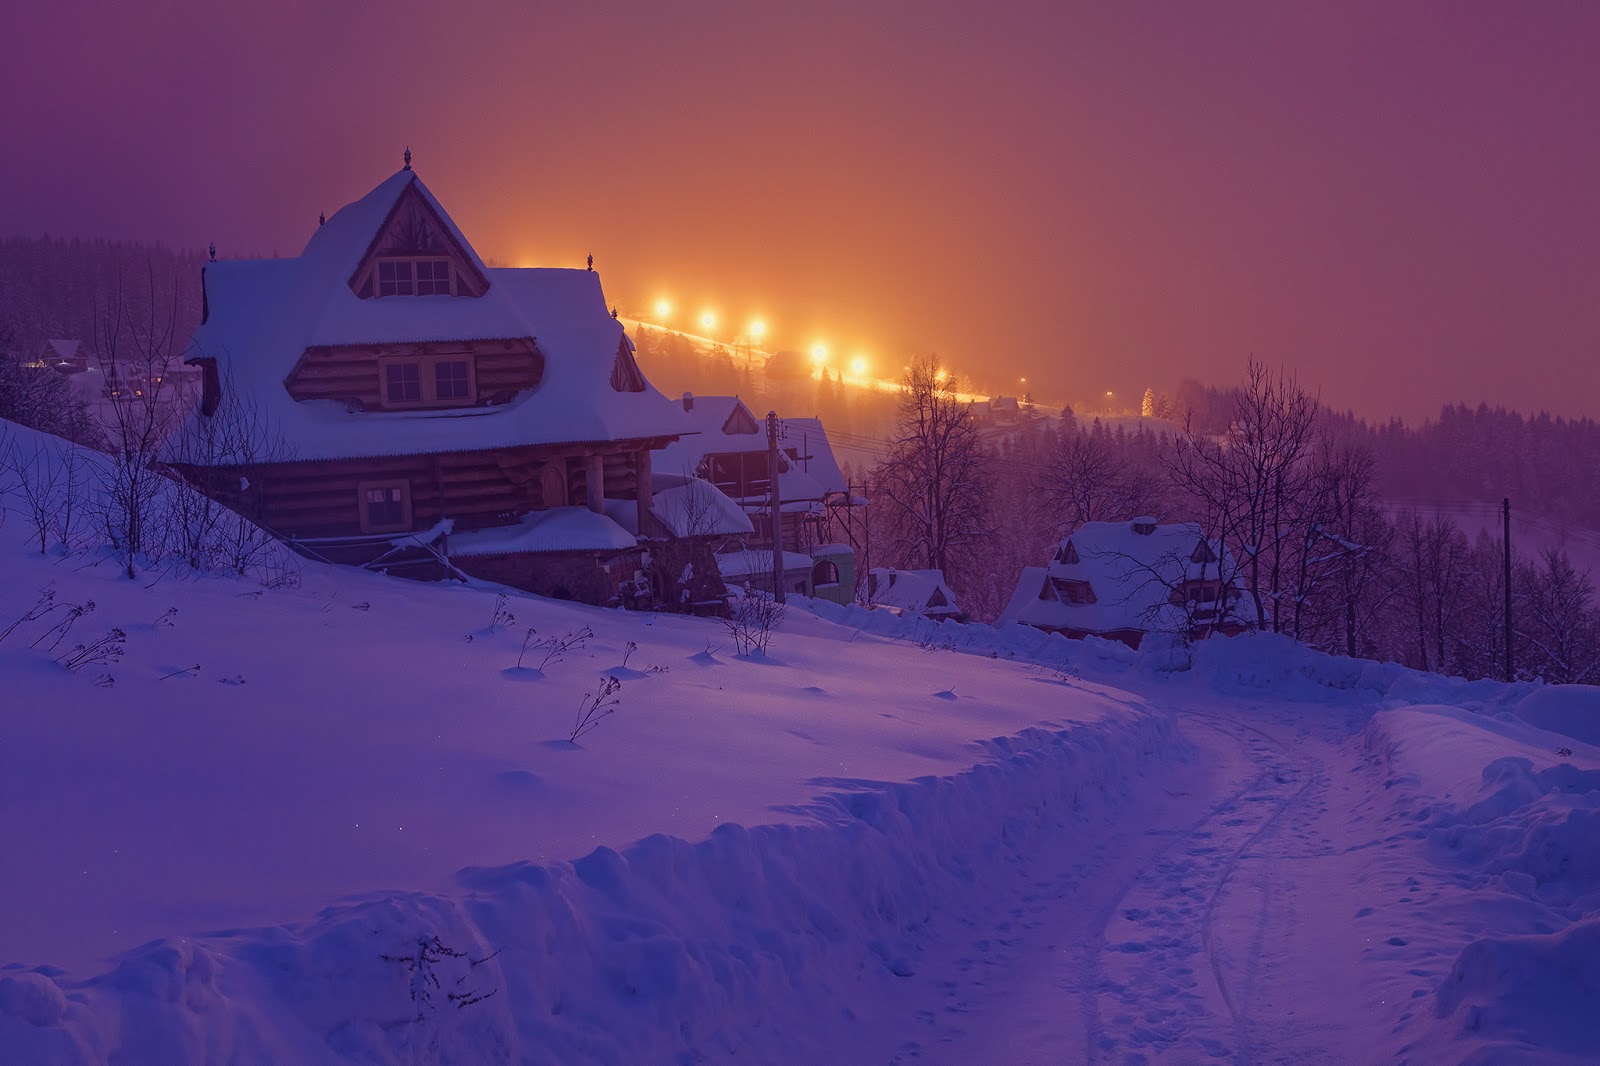
At this stage your photo might look like this:
It looks natural, that’s for sure. However, it lacks contrast and
colours a little bit (especially compared to tone-mapped images). So
what I typically do at this stage is to open my photos in Lightroom or
Photoshop and apply some adjustments there. Most of the time I increase
contrast, colour saturation and sharpen my images. After that I end up
with a photo like the one at the beginning of this article.


