a25 April 2012

Guard leaving his post

And yet another photo from Warsaw ZOO showing meerkat. Now I'm leaving for a few days so there won't be any updates probably. However, I should get back with some landscape shots :)
As you can also see I increased size of the images (but you can still click on them to see them in even larger size) and I also started to add map showing location in which the photo was taken.

Here is EXIF data:
Camera: Canon 5D MK II
Lens: Canon 70-300L IS USM
Focal length: 300 mm
Aperture: f/5.6
Shutter speed: 1/320 s
ISO: 160

Location:

View Larger Map

Continue reading for more details »

a24 April 2012

Let me free

Although I like ZOOs because they offer opportunity to see rare animals, visits in them make me sad. I sometimes think that those animals are longing for freedom (even though many of them were born in captivity already). Of course ZOO save species from extinctions but is it really fair? I mean we do this mostly for ourselves not the animals themselves as the species appear and disappear - it's sort of natural. Just a thought.

Here is EXIF data:
Camera: Canon 5D MK II
Lens: Canon 70-300L IS USM
Focal length: 300 mm
Aperture: f/5.6
Shutter speed: 1/250 s
ISO: 800

Location:

View Larger Map

Continue reading for more details »

a23 April 2012

In the ZOO

I took this photo yesterday during my visit to the Warsaw ZOO. I think this is one of my best photos in a while (although it isn't HDR). I'm really satisfied with composition and tones. But what was the most shocking for me was its sharpness. There was almost no need to sharpen it in post! Canon 70-300L amazes me every time I took a photo with it.

Continue reading for more details »

a22 April 2012

Just another street shot

This time another street photo from Lisbon. It isn't HDR.

Continue reading for more details »

a21 April 2012

Lightroom 4 - short review

I was testing Lightroom 4 beta and in the past Lightroom 3 trial as well. After my beta expired I decided to buy it. Although I'm still rather disappointed with its performance sometimes, I found it a very valuable addition to my workflow so I decided to share my ideas after using full-version for some time.

Continue reading for more details »

a20 April 2012

Street photo from Milan

This time HDR street photo taken in Milan.

Continue reading for more details »

a19 April 2012

Street in Rome

This time HDR photo showing a typical street in Rome.

Continue reading for more details »

a18 April 2012

A boat

Blue boat
Click on the photo to view it in large size on black background.
This time photo of a boat I took in Masuria, Poland.

Continue reading for more details »

a17 April 2012

A few words on my workflow


Compared to many photographers my HDR workflow is pretty simple (I sometimes think it's too simple in fact and not very professional) and doesn't contain many steps.

Normally I follow below steps:
  1. Apply some preliminary processing in Lightroom. Most of the time this is limited to setting white balance, applying lens correction and reducing chromatic aberrations. In case of photos taken with high ISO I can also apply noise reduction at this stage. I often apply some small sharpening here but this isn't a recommended practice :)
  2. Open images in Photomatix Pro using a Lightroom plugin. I start by choosing the most appropriate preset from my list of around 100 presets (believe me - having so many presets really helps as I rarely have to spend more than a minute adjusting settings). I have presets for sunsets, golden hour, winter, shooting sculptures, black & white, shooting inside the buildings, etc. Actually you can download my favourite ones. Then I adjust some sliders if I find this necessary (but often I don't need to). Most of the time I adjust Strength, Saturation and Luminosity. You can find details on my HDR processing in my tutorial.
  3. I save the image as 16-bit TIFF. Saving to 8-bit TIFF or JPEG has the effect of reducing quality and the gradients aren't that smooth anymore.
  4. After saving images they are automatically reimported to Lightroom. There I adjust settings like Vibrance (I often decide to reduce it to to the value between -5 to -20), Clarity (I often increase it to a value between 15 and 50), Contrast. If necessary I also correct colour balance at this step (especially greens as I have some problems capturing them properly). Similarly to Photomatix Pro, I often use presets at this step. At this stage I might consider that my photo is finished and export it to a JPEG file. However, if I decide on further editing it, I go to step 5.
  5. Export image in Photoshop... and now the real fun begins :) Yeah, I'm a great fan of Photoshop. I prefer to edit my photos in it and not in Lightroom (which I recently started to use as an organizer and to apply some very basic editing). However, my editing in Photoshop is also quite simple... and yes I do use presets (Actions in this case) to make it even simpler :) :
    1. I start with applying contrast. Most of the time I apply global contrast, only in case of difficult lightning conditions I can decide on doing it locally. Most of the time I use Curves for this purpose, sometimes Levels or Soft Light blending mode.
    2. I can sometimes change colors of the image to achieve stylized or very warm look. I do this by using photographic filters (especially warm ones), by editing curves, adjusting color balance (or hue/saturation) or by adding fill layers and blending them with the source image (using multiply or screen mode).
    3. I apply sharpening. Most of the time I do it using Smart Sharpen or Unsharp Mask. However, recently I started to sharpen with High-pass filter and I'm pretty satisfied with the results. As I often do have sky in my photos I often sharpen selectively. Sometimes I create Layer Mask and paint on it manually with a very soft brush. Often, however, I generate it automatically by finding edges in the image and applying sharpening only to them.
  6. Finally I save my image as a JPEG with a maximum quality.
This is my regular workflow of course. Sometimes I add several more steps (especially in step 5) but in most cases I don't.

Continue reading for more details »

a16 April 2012

Rio Tejo, once again

This is another view of the Rio Tejo (the Tagus River). I uploaded one not long time ago. The difference is composition is rather small but in this case I used Fusion/Natural processing method instead of Details Enhancer. The look is completely different for this reason.

Continue reading for more details »

a15 April 2012

Field in Black & White

I took this photo in Masuria, Poland. I used 5 photos shot at 2 EV spacing and merged them in Photomatix Pro 4.1.

Continue reading for more details »

a14 April 2012

Historical Centre of Sintra

This time photo showing historical centre of Sintra Town. Processed with Photomatix Pro 4.2 beta. The most difficult part in this one was to get water colour in this small fountain right.

Continue reading for more details »

a13 April 2012

Tutorial: Panning technique

There are two most common ways of showing action. One way is to freeze it with very fast shutter speed (like eg. 1/640 or even faster) to have everything tack sharp. The other way is opposite, i.e. to blur movement using slow shutter speed. In this short post I will focus on the latter technique.

Probably you've seen some photos where person or vehicle is in focus while the rest of the image is blurred horizontally making the image very dynamic. If not, take a look at my attempt. I took this photo in Milan. This effect can be achieved through technique known as panning.

The idea is to focus on the object using focus-tracking feature of your camera (AI Servo on Canons) and move the camera when it's going past you. Using slow shutter speed blurs the rest of the image.

Here are details:
  1. Set your camera to AI Servo mode or similar if you don't own Canon.
  2. Set your camera to Shutter-priority mode (TV or Canons) or Manual mode and set your shutter to slow value like 1/30 or 1/15 of a second (you can even try slower but this is usually good starting point).
  3. Focus on the object in a distance by pressing your shutter half-way down.
  4. Follow the object as it's approaching (AI Servo will focus automatically).
  5. When it's going past you press the shutter to take a photo. While pressing the shutter still follow the object. You can stop movement only when you hear shutter click. This will ensure nice and smooth blur of the background.
Though it's easy in theory, the practice makes it pretty difficult and it requires many attempts before success so don't be frustrated when you fail at the beginning.

One question remains. What about Image Stabilization? Well it would indeed ruin the photo as it would try to reduce shake which in this case is done on purpose. So it is better to disable it when using this technique. Also some lenses, like for instance Canon 70-300L have two Image Stabilization modes:
  • regular one - which tries to reduce all camera movement,
  • panning mode - which tries to reduce only shake in vertical axis thus allowing using this mode when panning (as the name implies).
Hope this helps!

Continue reading for more details »

a12 April 2012

Where did I leave this shoe?

Today I upload another older shot, taken in 2010 in Barcelona.

I don't know who and what for left this shoe but it was quite an extraordinary find :)

Continue reading for more details »

a11 April 2012

Yet another from gardens of the Monserrate Palace

Although this HDR shot taken in gardens surrounding the Monserrate Palace might be boring at first I like it for two reasons:
  • tones,
  • the rocks look like some sort of portal (I guess this was the idea) leading to a different world.

Continue reading for more details »

a10 April 2012

The Monserrate Palace

Monserrate Palace in Sintra
Click on the photo to view it in large size on black background.
The Monserrate Palace as other palaces in Sintra near Lisbon is a very exotic and strange place. It was built by Sir Francis Cook in 1858 and therefore it's surrounded by fascinating English garden (I felt like in the middle of the jungle... there is even a waterfall).

The photo above shows the gardens and the roofs of the palace. It's HDR merged from -2; 0; +2 photos and processed in Photomatix Pro 4.2 beta.

Continue reading for more details »

a9 April 2012

We're small and Licensing

This photo I took in Cabo da Roca, near Sintra, Portugal. 3 RAWs at -2; 0; +2 processed in Photomatix Pro 4.2 beta.

Today after some consideration I also added licensing section. In short my photos are available under Creative Commons license (unless stated otherwise for particular photos) but please refer to this link for details as there are some conditions you have to meet (especially you can't modify my works and you have to give me credit if you post them, share etc.).

If you want to use my photos for commercial purposes, please contact with me under tomanw@gmail.com as in such a case you can't use my photos for free.

Continue reading for more details »

a8 April 2012

Cascais and Soft Light blending mode

I took this photo in Cascais, near Lisbon. I used 3 RAWs and post-processed it in Photomatix Pro 4.2 beta.

Street photos are amongst my favourite HDR photos (the others being landscape and sunsets, castles , churches and black & white HDR photos). I really like how HDR adds some extra detail to this already busy and detailed images.

In this photo, as in many others, I used my favourite post-processing technique. It's very simple yet very effective. Here is the summary:
  1. Open your photo in Photoshop and apply some basic adjustments.
  2. Add Black & White adjustments layer on top of your layers and adjust it so it looks good.
  3. Change blending mode of this new adjustment layer to Soft Light.
  4. At this stage the contrast of the image will be greatly enhanced. However, you will loose quite a lot of detail (especially in the shadows). So using soft black brush (with flow ranging 10% to 20%) I paint on Layer Mask to restore some detail.
Normally I also decrease opacity of Black & White adjustments layer to make the effect more subtle.

Continue reading for more details »

a7 April 2012

Castello Sforzesco

Castello Sforzesco, is in my opinion the most interesting spot in Milan city. Built from brick in XV century was seat of the Duchy of Milan and one of the biggest citadels in Europe of its times.

This photo was taken some time ago. It's HDR from 3 RAWs and processed in Photomatix Pro 4.1.

Today, like yesterday, I added new wallpaper to the wallpapers section. This time it was on request and it's following photo:

Continue reading for more details »

a6 April 2012

Another Lisbon street and new wallpaper

This time another street of Lisbon. I took 3 RAWs (-2; 0; +2) and processed them in Photomatix Pro 4.2 beta. I especially like golden tones in the left side of this photo and the arch in the back. Hope you like it too.

Today I also added one HD wallpaper to the wallpapers section. This time it is one of my favourite HDR photos:

Continue reading for more details »

a5 April 2012

Reflections, circular polarizer and minor changes to blog (again)

I will start with a few words on recent changes to this blog. First, I removed most of the content of the right column to make it more clear and easier to use. I left only important gadgets, like tags and blog archive (removed this huge Facebook widget...). Another change I made is addition of the share buttons below each post (and page). You can now "tweet", "like" or "+1" with a single click (ok, technically it was possible previously as well but looked a bit worse and there wasn't a counter next to each of the buttons). Not many of you shared anything but I hope the things will start to change soon. The last thing I changed are changes related to tags. I fixed tags for all the posts up to now (as some posts had wrong tags assigned) and I removed some unimportant ones.

Continue reading for more details »

a4 April 2012

Action shots with Canon 70-300L

When looking at this blog's stats I've noticed that many users find it in Google because they search for information on Canon 70-300L lens. I wrote short review about this fantastic lens some time ago and also posted one portrait. Today I decided to add some more photos from the photoshoot from January and here are they (so today is no-HDR and no-tutorial day :) ).

As you can see in the photos below this lens produces some very nice colours, contrast and bokeh. I used it on Canon 5D MK II whole day.

Please note I'm not experienced in horse photography (it was my first attempt ever!). The "model" is Ghost (Duszek in Polish language):

Having fun in the snow. He started playing out of a sudden and I was lucky to take just 3 shots total. Incredible :)


Just some portraits

Ghost is very fast, it was terribly difficult to froze his motion. The lightning conditions didn't make it any easier as it was pretty dark (despite the snow) so I had to use some faster ISO at times.


As a landscape/architecture photographer I don't use this lens very often (mostly to get closer to some interesting detail) but when I have a chance, I really love the results. So after having it for a few months now, I can still recommend it.

Continue reading for more details »

a3 April 2012

Tutorial: Fake HDR, multiple exposures from single RAW


One of the useful features of Photomatix Pro is that you can tonemap a single file (RAW, JPEG or TIFF). There is, however, a trick which allows you to process a single RAW file the same way as bracketed sequence and in my opinion this technique produces slightly better results. How can you do this? Read on.

In this short tutorial I will use Adobe Camera RAW but any RAW converter (including Lightroom, Canon Digital Photo Professional etc.) will work as well.

The idea is to create multiple exposures out of a single RAW file by varying exposure value in the RAW converter. Of course this means that apart from the exposure the rest of the parameters (like for example White Balance) have to be exactly the same for all the files as otherwise the results might be quite weird.
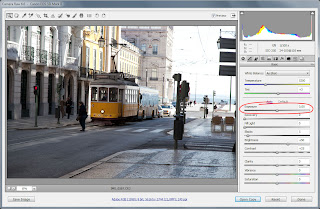
  1. First open your RAW file in Adobe Camera RAW.
  2. Set all your settings as desired (including White Balance). All settings apart from Exposure have to be the same for all images.
  3. Change Exposure value to -2.0.
  4. Click Save Image button and output it under the name eg. fake_HDR_1.tif
  5. Change Exposure value to 0.0.
  6. Click Save Image button and output it under the name eg. fake_HDR_2.tif
  7. Change Exposure value to 2.0.
  8. Click Save Image button and output it under the name eg. fake_HDR_3.tif
Now you will have 3 exposures you can load into Photomatix Pro the same way you load bracketed photos. In our case the new photos will be:

Note the difference in the sky. In the darkest image it's blue whereas in the rest of the images it's completely blown out.

Now drag your images into Photomatix. Following dialog box will appear.

What we really changed in Adobe Camera RAW was image pixels but the data in EXIF remained the same, meaning that all images will have the same exposure information (i.e. shutter speed, ISO and aperture). Photomatix tries to guess EV based on the images but in case it's wrong you can change the values in the last column manually. In case of this example I changed +3,00 in the first row to +2,00 as this was what we typed in Adobe Camera RAW for the brightest image.

The rest of the process is exactly the same so I skip it here as you can read about it eg. in my HDR tutorial.

The image at the beginning of this post has been created this way. I used 5 files created from 1 RAW photo and used exposures of: -3.0, -1.5, 0.0, 1.5, 3.0. Thanks to -3.0 I restored some detail and colour in the sky. 0 EV photo had almost completely white sky what didn't look very good nor appealing.

Please note that the effects won't be as good as when using real bracketed photos, eg. I would have much better colours and details in the sky but to be honest I initially didn't intend to make HDR of this photo but then I changed my mind.

Continue reading for more details »

a2 April 2012

I don't like this photo

It's one of my photos I'm not very happy with. It was taken in Berlin in 2010 and shows the Berlin Cathedral (Berliner Dom). I was surprised some time ago to discover that this photo is amongst my most popular photos with many retweets/reblogs/shares, etc. To be honest I also didn't like photo I uploaded yesterday.
Although I find such situations quite nice more often it's opposite - I think that some photo is great but it doesn't reach as many people as I think it deserves.

Continue reading for more details »

a1 April 2012

Spyder4Pro review

Lone man in the middle of the crowd by Wojciech Toman (WojciechToman) on 500px.com Monitor calibration is a must when doing some serious photo editing and as I'm slowly getting more serious about this I decided to calibrate my new LCD display.
I started with manual calibration (adjusting gamma, brightness, contrast etc.) to match a given pattern and following some complex instructions. However, this process was a real pain and what's worse I couldn't get it right. I always ended up with either slightly green or blue cast. So after a few trials I gave up and purchased Spyder4Pro calibrator from DataColor. And I must say I'm impressed.

Spyder4Pro package includes two main elements:
  • Spyder4Pro software - which is responsible for communication with the user and flashing colour planes in the calibration process,
  • Spyder device making all the measurements - it reads the colours displayed by your monitor and they are compared to the pattern.
After short installation, activation and registration process real calibration starts. First you have to specify type of your monitor (CRT, LCD, laptop screen), then you're asked to specify your target settings (gamma and white point). You can also specify brightness of the display but there is also an option to adjust it automatically based on the ambient lighting. I used the second option - Spyder4Pro made short measurements and based on it adjusted brightness as required (and I'm really thankful it did so because my monitor was much too bright for my eyes to work comfortably).

Finally you are asked to put Spyder device in the middle of the screen. At this stage provided software starts flashing different colours on the screen and Spyder device makes measurements. This process lasts for a few minutes and when it is finished new monitor profile is created and you can save it. It will be made default and loaded every time you start Windows.

The next step allows you to see difference between uncalibrated and calibrated display. You can choose from several images and switch between uncalibrated and calibrated display to see a difference. And believe me, it's really really noticeable. For me the most significant difference were details in highlights, Spyder4Pro restored quite a lot of them. Colours were quite natural in my case even before calibration process so I haven't noticed great improvement in that case.

The last step are some analysis, eg. you can see how much of each colour space your monitor is capable of displaying.

But it's not all I have to write about Spyder4Pro. Pro version makes it possible to make measurements of the ambient light. If it finds out that the difference between current conditions and conditions under which monitor was calibrated is too high it will ask you to recalibrate. This will ensure that colours are looking the same all the time. If the difference detected isn't that high, Spyder4Pro will make small adjustments. Another benefit of Pro version is that you can calibrate multiple display devices using only one Spyder, you don't need to buy several licenses for each of them. It's really useful when you use several computers or as in my case: PC and laptop.

Summing up. Spyder4Pro is really great. I can really recommended it to anyone serious about photo editing as it does really great job. Also the calibration process is pretty quick so you won't waste much time even if you will calibrate your monitor often.

One more thing, this time not related to Spyder. The photo uploaded with this post is so far my most popular photo. I took it in Lisbon in February and since I uploaded it to 500px about a month ago it had 3500 views. Quite nice :)

Continue reading for more details »